Understanding the Beaming White System
Achieving a brighter, whiter smile from the comfort of your home has become increasingly accessible, and the Beaming White Home Whitening System is a popular choice for many. This system offers a convenient and cost-effective alternative to professional teeth whitening treatments. The Beaming White system typically utilizes a combination of a whitening gel, a mouth tray, and an LED accelerator light to help you achieve a noticeably whiter smile. This guide will provide you with comprehensive instructions on how to effectively use the Beaming White system, ensuring you can maximize your results while maintaining the health of your teeth and gums. It’s important to carefully follow the directions and take your time to understand each step. Doing so will not only help you achieve the desired results, but also minimize any potential discomfort or sensitivity during the process. The system is designed for ease of use, but understanding each component is crucial for its effectiveness.
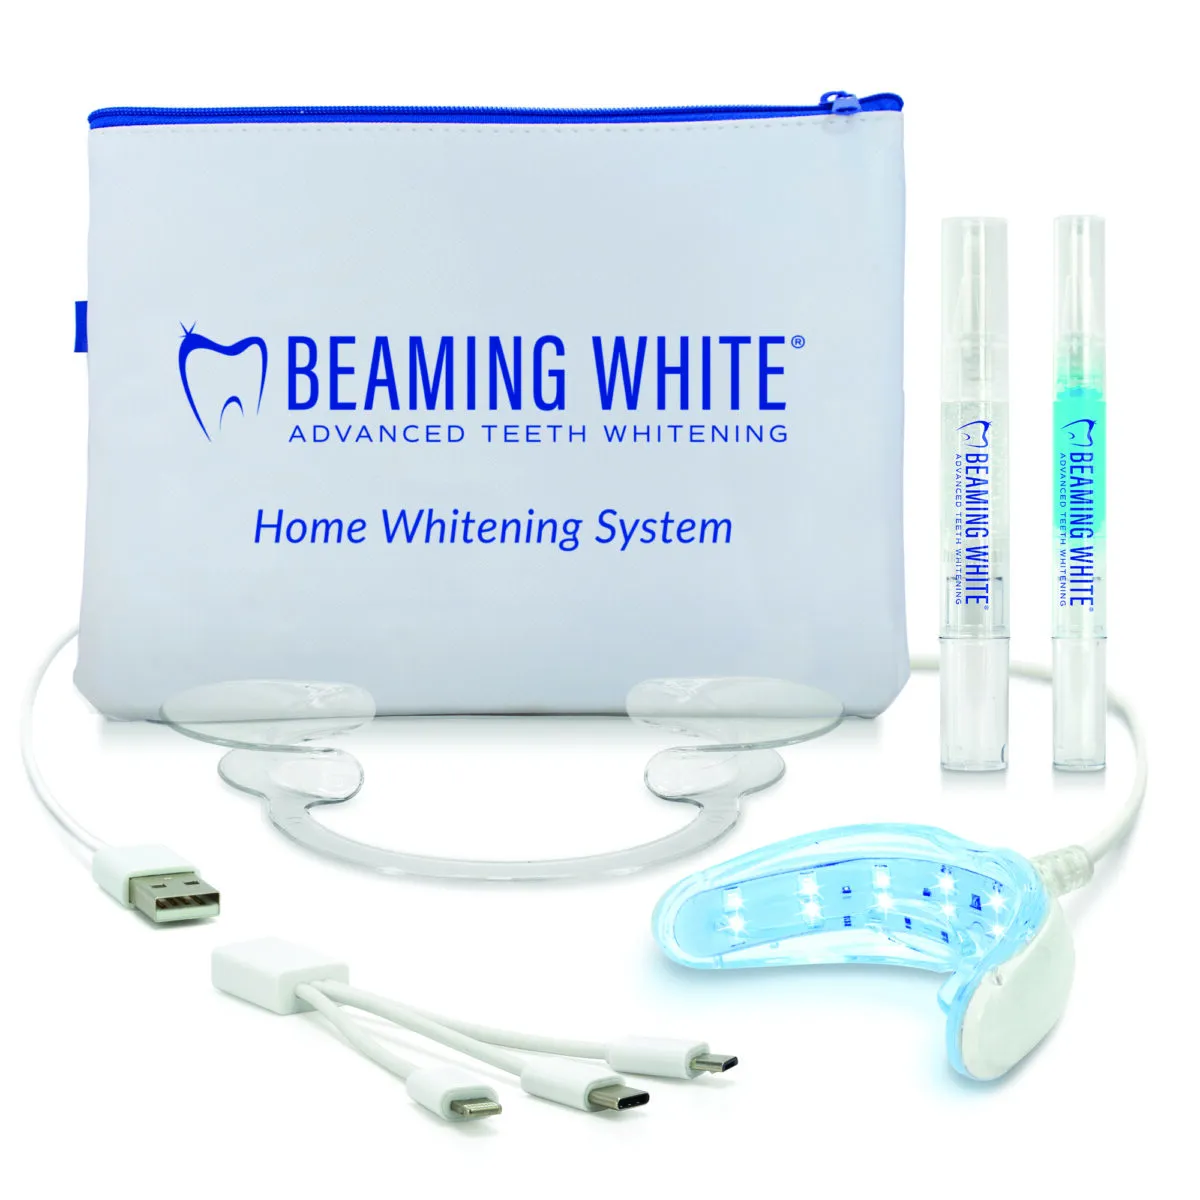
Components of the Beaming White System
To effectively use the Beaming White system, it’s essential to familiarize yourself with its components. The kit is designed with specific elements working together to deliver a whiter smile. Each part plays a crucial role in the overall process, from applying the whitening agent to accelerating its action. Understanding these components allows for a more informed and effective treatment, ensuring you get the best possible results. The system usually includes a whitening gel, a mouth tray, and an LED accelerator light. Some kits might also include a shade guide to help you track your progress. Let’s take a closer look at each of these components.
The Whitening Gel

The whitening gel is the core component of the Beaming White system. It typically contains a concentration of hydrogen peroxide or carbamide peroxide, the active ingredients responsible for teeth whitening. This gel works by penetrating the enamel and breaking down the stains and discoloration that have accumulated over time. The concentration of the active ingredient varies, and it’s crucial to follow the product instructions to ensure you’re using the correct amount and duration. The gel’s formulation is designed to be safe for home use when used as directed, but it’s also potent enough to deliver visible results. The effectiveness of the gel is further enhanced by the use of the LED light, which accelerates the whitening process. Always check the expiration date of the gel and store it as directed to maintain its efficacy.
The Mouth Tray
The mouth tray is a custom-fit or a universal tray designed to hold the whitening gel against your teeth. The tray ensures that the gel comes into consistent contact with the teeth, allowing the whitening agents to effectively penetrate the enamel. Proper use of the mouth tray is essential for even whitening and for preventing the gel from coming into contact with your gums, which could lead to sensitivity. Before using the mouth tray, you may need to mold it to fit your teeth perfectly. This usually involves immersing the tray in hot water to soften it, then biting down on it to create a custom fit. A well-fitting tray not only enhances the whitening process but also minimizes any potential irritation. Always clean the mouth tray thoroughly after each use to remove any residual gel or bacteria, and store it in a clean, dry place.
The LED Accelerator Light
The LED accelerator light is a key component of many Beaming White systems, designed to enhance the whitening process. This light emits specific wavelengths of light that activate the whitening gel, accelerating its effect and leading to faster results. When the light shines on the whitening gel, it helps to break down the stains on your teeth more efficiently. The LED light is typically battery-powered or can be plugged in and is designed for safe home use. Ensure that the light is properly aligned with your teeth and the mouth tray for optimal results. The duration of light exposure is usually specified in the instructions. Using the LED light in conjunction with the gel can significantly boost the effectiveness of the whitening treatment, helping you achieve a brighter smile in a shorter amount of time.
Step-by-Step Directions for Using the Beaming White System

Following the step-by-step directions is crucial for the success of the Beaming White system. This ensures that you are applying the treatment correctly and safely. Carefully reading and understanding each step can help you avoid common mistakes and maximize the whitening results. The process is designed to be user-friendly, but it’s essential to take your time, follow the instructions precisely, and maintain good oral hygiene throughout the process. By following each step carefully, you can achieve a noticeably whiter smile while minimizing the risk of any adverse effects. Be sure to consult the specific instructions provided with your Beaming White kit, as some steps or the duration of the treatment may vary slightly depending on the product.
Preparing Your Teeth
Before you start the whitening process, it is important to prepare your teeth properly. Begin by brushing your teeth gently to remove any food particles and plaque. It’s important to rinse your mouth thoroughly after brushing. Ensure your teeth are completely dry before applying the whitening gel. This will help the gel adhere better to your teeth and enhance its effectiveness. Avoid using toothpaste with fluoride immediately before the treatment, as it can create a barrier that reduces the gel’s effectiveness. Use a soft-bristled toothbrush to avoid irritating your gums. Taking these initial steps ensures that your teeth are clean and ready to absorb the whitening agents. This initial preparation helps set the stage for optimal results from the Beaming White system.
Applying the Whitening Gel
After preparing your teeth, the next step is to apply the whitening gel. The amount of gel required varies by product, so carefully follow the instructions provided with your Beaming White kit. Typically, you will apply a small amount of gel to each tooth surface within the mouth tray. Be careful not to overfill the tray, as excess gel can leak and irritate your gums. Ensure the gel is evenly distributed across the teeth to ensure uniform whitening. If your kit includes a syringe applicator, use it to apply the gel precisely to each tooth. After applying the gel, immediately insert the mouth tray into your mouth, ensuring it is properly aligned and seated comfortably. This even application is crucial to achieve the desired level of whitening without causing uneven results or unnecessary sensitivity. Always wash your hands after handling the gel.
Using the LED Accelerator Light

Once the mouth tray filled with the whitening gel is in place, the next step is to use the LED accelerator light. Position the light so that it directly shines onto your teeth, ensuring it covers the entire surface of the teeth you wish to whiten. The length of time for light exposure will be specified in your product’s instructions, typically ranging from 10 to 30 minutes. During this time, the light will activate the whitening gel, speeding up the stain removal process. Make sure to keep the light in place throughout the entire duration. If your kit has a timer, use it to keep track of the time. If you experience any discomfort during the process, such as sensitivity or irritation, discontinue use and consult the product’s instructions or your dentist for guidance. This combination of the gel and light is designed to significantly enhance the whitening results, providing you with a brighter and more confident smile.
Rinsing and Cleaning
After completing the whitening treatment, it is important to rinse your mouth thoroughly and clean the mouth tray. Remove the mouth tray and discard any remaining gel. Rinse your mouth with water to remove any residual gel from your teeth and gums. Do not swallow the water. Rinse the mouth tray with lukewarm water and ensure it is completely clean of any gel residue. Avoid using hot water, as it can damage the tray. Dry the tray and store it in a clean, dry place. After this procedure, brush your teeth gently with a soft-bristled toothbrush to remove any remaining whitening product. Follow these cleaning steps to ensure hygiene and prevent the build-up of bacteria. This ensures the process is both effective and hygienic, preparing your mouth for the next treatment session.
Maximizing Results and Maintaining Your Smile
To achieve the best results and maintain your newly whitened smile, it’s important to follow a few key guidelines. Consistency is important, so stick to the recommended treatment schedule provided with your Beaming White system. Additionally, make adjustments in your diet and lifestyle. Certain foods and drinks, such as coffee, tea, red wine, and dark-colored berries, can stain your teeth, so it’s best to minimize their consumption, especially during the whitening process. Avoiding smoking is also crucial, as it can significantly stain your teeth and reduce the effectiveness of the whitening treatment. These precautions ensure you not only achieve a brighter smile, but also keep it for a longer time. By carefully following the treatment schedule and making conscious choices about what you eat and drink, you can enjoy a beautifully white smile.
Following the Treatment Schedule

The treatment schedule is typically outlined in the instructions that come with your Beaming White system. This schedule is usually designed to progressively whiten your teeth while minimizing the risk of sensitivity or irritation. Following the recommended schedule is crucial for achieving the desired results and for your oral health. This will usually involve a specific number of treatments over a certain period. It’s important to stick to the guidelines to avoid over-whitening, which can lead to sensitivity, or under-whitening, where you don’t see the desired results. Do not exceed the recommended treatment duration unless advised by a dental professional. Keeping to the schedule provided guarantees that the process is both effective and safe, leading to a brighter smile without damaging your teeth or gums.
Tips for Avoiding Sensitivity
Tooth sensitivity is a common side effect of teeth whitening treatments. To minimize sensitivity, there are a few steps you can take. If you experience sensitivity, reduce the duration of each whitening session or skip a day. Use a toothpaste specifically designed for sensitive teeth, as these toothpastes contain ingredients that help to block the tubules in the dentin, reducing sensitivity. Avoid eating or drinking extremely hot or cold foods and drinks, as they can exacerbate sensitivity. You might also consider using a fluoride rinse, as fluoride can help to strengthen your enamel and reduce sensitivity. If the sensitivity persists or becomes severe, consult your dentist. By taking these measures, you can enjoy a whiter smile with minimal discomfort. Be aware of your body and adjust your treatment accordingly.
Maintaining Your White Smile
Maintaining your newly whitened smile involves several strategies to keep your teeth bright and prevent future staining. Regular dental check-ups and cleanings are essential for maintaining good oral hygiene and removing any surface stains. Continue to practice good oral hygiene by brushing your teeth twice a day with fluoride toothpaste and flossing daily. Avoid or limit your consumption of staining foods and drinks. Consider using a whitening toothpaste or mouthwash for daily maintenance. You can also touch up your whitening treatment periodically as needed, following the guidelines provided with your Beaming White system. By combining consistent oral hygiene with mindful dietary choices, you can enjoy a bright and confident smile for years to come. Make this maintenance a part of your routine to preserve your investment in a whiter, brighter smile.